| .github | ||
| .gitlab | ||
| .jpb | ||
| .runConfigurations | ||
| backend | ||
| frontend | ||
| gradle/wrapper | ||
| img | ||
| licenses | ||
| manifests | ||
| root/etc | ||
| .dockerignore | ||
| .editorconfig | ||
| .gitignore | ||
| .gitlab-ci.yml | ||
| .releaserc.yml | ||
| build.gradle | ||
| CHANGELOG.md | ||
| CODE_OF_CONDUCT.md | ||
| CONTRIBUTING.md | ||
| Dockerfile | ||
| gradle.properties | ||
| gradlew | ||
| gradlew.bat | ||
| HELP.md | ||
| LICENSE | ||
| Project.xml | ||
| qodana.yaml | ||
| README.md | ||
| renovate.json | ||
| settings.gradle | ||

Sources, GitHub, GitLab and Mirroring and all that good stuff
Repositories on GitHub are now for issues only. I've set up my own installation of GitLab and moved all my repositories over to Git.Griefed.de. Make sure to check there first for the latest code before opening an issue on GitHub.
For questions, you can always join my Discord server and talk to me there.
This repository is available at:
- Source: https://git.griefed.de/Griefed/ServerPackCreator (Source code,releases,downloads)
- Mirror: https://gitlab.com/Griefed/ServerPackCreator (Source code,releases,downloads)
- Mirror: https://github.com/Griefed/ServerPackCreator (Source code,releases,downloads)
- Mirror: https://gitea.com/Griefed/ServerPackCreator (Source code)


ServerPackCreator is a Java-program which creates a server pack from any given Forge, Fabric, Quilt or LegacyFabric modpack. Customize the configuration to your liking and off you go. Whenever you are working on an update to your modpack, you simply run ServerPackCreator and BAM! You've got yourself a server pack for your new modpack version.
ServerPackCreator is a passion project on which I am working in my spare time. It is also the main reason for why I got into programming in the first place.
I started getting into Java programming in february 2021, when I was working on an update for one of my Minecraft modpacks, Survive Create Prosper 4, and got tired and bored with manually creating a server pack everytime I wanted to update and test something, or just release a new server pack for the new modpack version.
The thought "There must be a way to automate this, or at least make it less tedious..." was the spark which sent me off into the world of programming.
And here we are.
Required: Please be aware that ServerPackCreator requires a working internet connection in order to work properly. Features like letting ServerPackCreator install the modloader server, updating the fallback modslist, checking for updates etc. require internet. You may use SPC without a proper internet connection, but please keep in mind that functionality will be limited. The first run will create all necessary files and folders in the directory in which you are running ServerPackCreator. Move it to a dedicated directory before using it!
Note: For more detailed information about all the different configuration options and possibilities of ServerPackCreator, take a look at the Wiki of check out HELP.md.
Advice: When using alpha, beta or in-dev version of ServerPackCreator, it is advised to do so in a different directory than your regular ServerPackCreator installation.
Screenshots
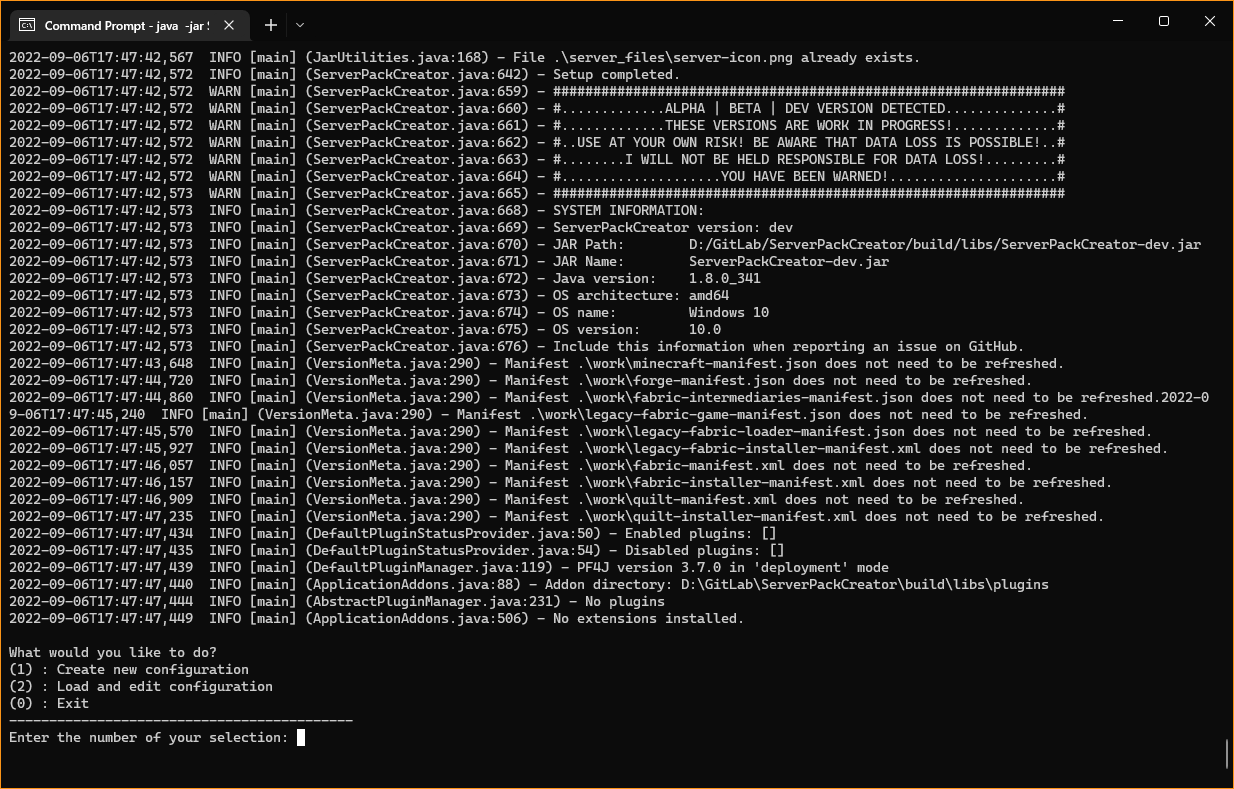
Commandline Interface (CLI)
Graphical User Interface (GUI)

Advantages/Disadvantages of CLI, GUI:
Each way of using ServerPackCreator has its advantages and disadvantages. Depending on your environment, it may be better to use one way over the other. This section highlights some of the advantages and disadvantages of each version to help you decide which way you are going to use. Note: All three ways are supported by the .jar-file. Which one is started depends on the CLI arguments used and your environment.
CLI:
| Advantages | Disadvantages |
|---|---|
| No need for a graphical environment. Can be used on a server to generate a server pack for immediate use. | Gathering of information for a configuration file is tedious. |
Step-by-Step generation of a configuration-file with the use of the -cgen argument. Generated config will be used immediately afterwards. |
No convenience features file folder-browsing or jumping to the generated server pack after generation. |
| Load and edit an existing configuration. Editing is limited to base values of a given configuration. Not editable via CLI are script settings as well as any potentially installed addon configuration. | Debugging in case of a broken/erroring configuration file can be time consuming. Careful reading of logs is required. |
| Manual editing of the configuration-file in case you want to change it. | |
| Unable to edit start script placeholders and variables |
GUI:
| Advantages | Disadvantages |
|---|---|
| Browse the filesystem for folders and file required by the configuration. | Requires a graphical environment. |
| Setting up a configuration by browsing the filesystem and selecting your Minecraft and modloader versions from a list. | |
| Browsing the generated server pack after generation has finished. | |
| Loading and saving different configurations for quick generation of multiple server packs in short succession. | |
| Edit the configuration in the GUI. No manual file-editing required. | |
| Edit start script placeholders and values |
Webservice:
ServerPackCreator also has a webservice which you can run with the -web-argument. However, this webservice is still barebones and prone to massive improvements in a later milestone, so usage of said webservice-mode is not advised at this moment.
1. Known issues and help
-
A list of known issues can be found in Known Issues.
-
If you want to report an issue, please make sure to follow the templates on GitHub and provide as much information as detailed as possible. The more information and details you provide for your issue at hand, the easier it is for me to investigate it!
-
A wiki article containing useful hints, tips & tricks about, for and with ServerPackCreator can be found on my Wiki's ServerPackCreator Help page
2. Small feature overview
- Exclude clientside-only mods
- Automatically by letting ServerPackCreator scan the mods of your modpack for their sideness
- Manually by configuring a list mods which ServerPackCreator will filter out according to your input and the chosen filter.
- Add files and directories in your server pack.
- Files and directories in your modpack
- Files and directories from your computer
- Add a server icon
- Server icons are automatically scaled down, or up, to 64x64!
- Specify a custom one, or use a default provided by ServerPackCreator.
- Change the default to your liking if you intend on using the same icon across multiple server packs!
- Add a server.properties
- Ship your server pack with default settings!
- Specify a custom one, or use a default provided by ServerPackCreator.
- Change the default to your liking if you intend on using the same icon across multiple server packs!
- Many modloaders supported
- Forge
- Fabric
- LegacyFabric
- Quilt
- Use Minecraft snapshots and pre-releases
- Per default, only regular releases enabled
- Let ServerPackCreator install the modloader-server for your server pack, for immediate testing and debugging after generation!
- Let ServerPackCreator generate a ZIP-archive, for immediate upload to places like CurseForge (after you've tested your server pack, of course 😉)
- Configure commandline arguments with which to start the Minecraft server
- Does your modpack require a lot of RAM? Well, tell ServerPackCreator to create the start scripts with
-Xms8G -Xmx8Gor similar values! - Aikars flags are available, too. If you like 'em, use 'em.
- Does your modpack require a lot of RAM? Well, tell ServerPackCreator to create the start scripts with
- Create your own start-script templates
- Add additional functionality to your servers start scripts
- Use placeholders in your templates, to be replaced with custom values
- Example: placeholder
SPC_FLYNN_LIVES_SPCin the templates can be replaced with a value configured on a per-server pack basis, i.eNow that's a big door
- Example: placeholder
- Addons!
- ServerPackCreator allows you to use addons to add new features in various places.
- An example addon can be found at the Example Addon Repository. It has simple examples for every possible addon and extension in ServerPackCreator
3. How To
This How-To guide was inspired by the wonderful Kreezxil. Guide originally from his website, with permission to add it to this README.
ServerPackCreator does what Kreezxil's articles do to create your server pack. It takes away the building part, not the debugging part. However, it gives a nice installer script which stops players from asking how to install a pack made with it. The scripts run on both Windows, and Linux, and probably also Mac.
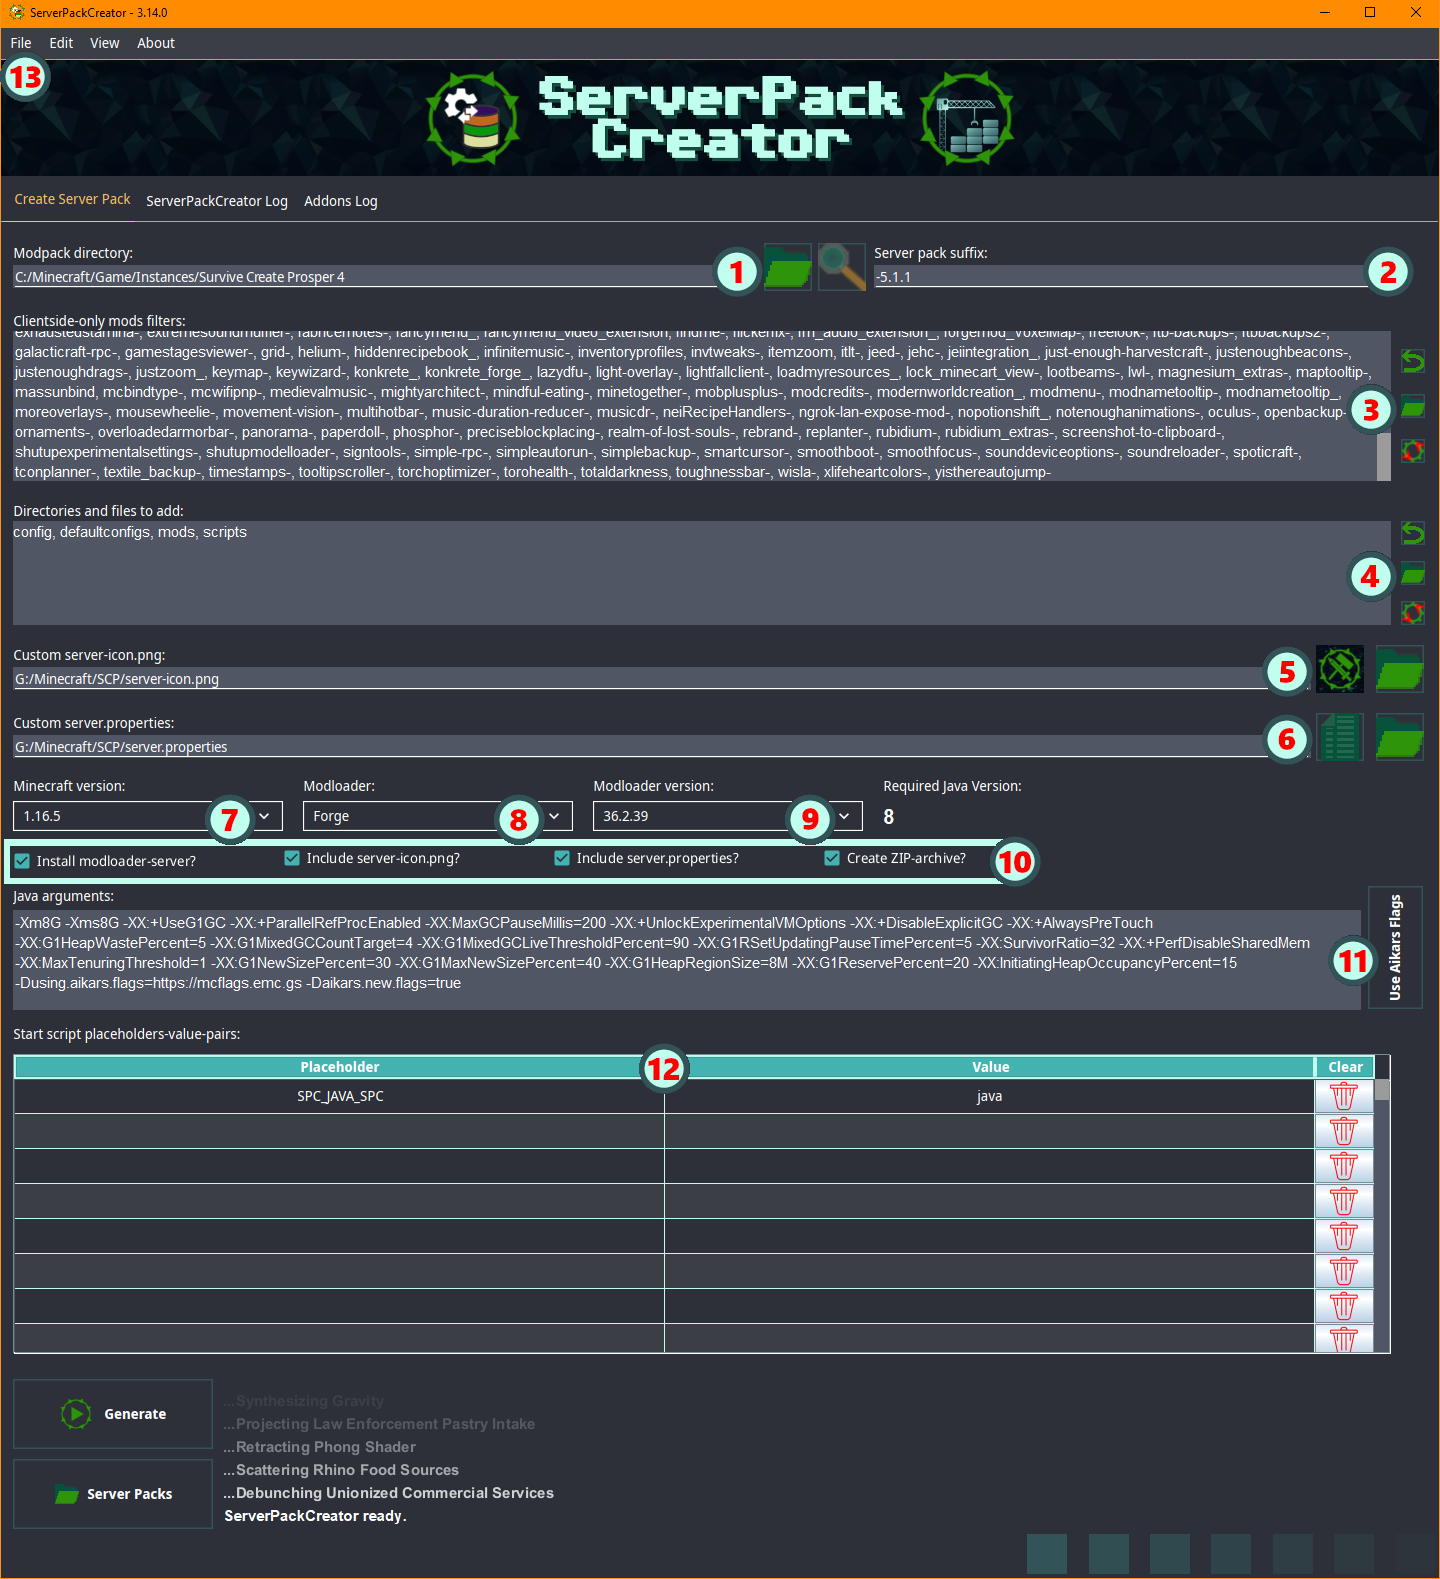
I’ve placed numbers on the screenshot, and here’s what those sections do:
- Click the folder-button to browse to select the folder where the client pack/modpack lives.
- Optional! Specify a suffix for your server pack. It should honestly match the client pack version you’re distributing.
- Click this folder to navigate to the mods folder of your client pack. Here, you will CTRL select only those mods that run on a client exclusively. If the mod runs on a server, do not select it. Do not select everything, if you do that you’re failing right out the gate. Check the mod’s page to know for sure if it’s client only. If you are completely unsure which mod in your modpack should be selected, skip this step and keep the default list you see in the screenshot.
- After clicking this folder, you will choose those folders that must be included in your server pack for it to function properly. These should honestly at minimum be the
modsandconfigdirectories. Without these, your server pack would not be compatible with your modpack. - Optional! Click the folder-button to browse to an image file which should become the server icon of your server pack.
- A preview of the server-icon is displayed on the right
- If the server-icon setting is empty, the default icon will be displayed
- Optional! Click the folder-button to browse to a server.properties-file you want your players to use with your server pack. With this, you can provide default settings like difficulty, or the world-type.
- Select the Minecraft version of your modpack.
- Select the mod loader you are using.
- Choose the exact version of the modloader you are using.
- In this section are options that you can toggle. I recommend to toggle them all on. It will pre-install the modloader server so you can immediately start and test/debug, include the server-icon.png (either you specified one, or a default will be used), include the server.properties (either you specified one, or a default will be used) and finally, create a ZIP-archive of your server pack.
- Optional! JVM arguments, also called Java flags, to start your server with. Have you heard of the so-called Aikars Flags? You can use them via the
Use Aikars Flags-button, or set your own. Useful if your server pack needs a lot of RAM and you want your server pack users to not have to work with these values themselves. - Optional! This table lets you edit the Java path used in the start scripts. This does nothing for the scripts in the ZIP-archive, so don't worry. If your modpack and server pack need a different Java version to run, you can set the path the that Java versions binary/executable here.
- Optional! Even more optional that #5, #6, #11 and #12, under this menu is an option to save and load a custom configuration. Useful for if you have more than one mod pack for which you make server packs. Note: Regardless of what you do, a default configuration exists.
And finally hit the play button ("Generate") to build the server pack. Once it is done, the app will ask if you want to go there. You should do that, and activate one of the start-up scripts that matches your system.
For more, go follow the rest of the relevant articles at Kreezcraft-How to make a Forge server from a Forge pack and Kreezcraft-How to make a Fabric server from a Fabric pack.
3.1 Bonus
3.1.1 Automatic Minecraft version, modloader and modloader version detection
Upon selecting the modpack directory, ServerPackCreator will scan said directory and try to determine the required Minecraft version, modloader and version of the modloader. ServerPackCreator will inform you about the versions and modloader it discovered. In case you want to re-scan the modpack-directory, hit the button with the magnifying glass-icon!
3.1.2 Using default settings, reverting to configuration value
Sometimes you want to go back a couple of steps. The list of clientside-only mods and directory and files to include in your server pack each provide you with two convenience-buttons.
The top one, with the arrow pointing backwards, will revert the adjacent field back to the value of the last loaded configuration.
The bottom one, with the cog and two red arrows, will reset the adjacent field back to the globally set, ServerPackCreator wide, configuration, regardless of what your configuration specified. Defaults! Factory setting! Ya know. Back to the..future or something.
3.1.3 Open your server.properties
The left button next to the custom properties field opens the server.properties file in your computers default text-editor. If no custom properties-file has been configured, the default one will be opened. If you've configured a custom properties-file, the custom one will be opened.
Bear in mind: The default one is, just as the factory settings for clientside-mods and files/directories to include, used globally by ServerPackCreator. Edit with caution!
3.1.2 Minecraft 1.12.2 Java 8, Minecraft 1.18.2 Java 17 and all that fuzz
Do you have Minecraft modpacks which require different Java versions? Say, a Minecraft 1.12.2 pack, requiring Java 8, and a Minecraft 1.18.2 pack, requiring Java 17? Check out how ServerPackCreator can automatically update the Java path in the created start scripts to your required Java versions, depending on which Minecraft version and therefor Java version is desired! Read Me!
When configured correctly, everytime you change the Minecraft version the SPC_JAVA_SPC-placeholder value in the script settings table will be adjusted according to the Java
version required by the selected Minecraft versions server.
Very convenient if you switch back and forth between modpacks which need different Java versions. This change only affects the scripts for local testing and debugging.
Scripts in ZIP-archives are not affected. They will always point to java, unless you've provided your own start script templates. That's a story for another day though.
3.2 Further help
More help is available at the official ServerPackCreator Help Wiki Section.
It goes into detail on the many configurable aspects of ServerPackCreator.
Give it a read before asking something, it does contain lots of useful information. 🙂
4. Java
ServerPackCreator is being developed with Java 8, ServerPackCreator is guaranteed to work with that version.
Users have reported the following Java versions to also work with ServerPackCreator. A list of these can be found at the Wiki help section
ATTENTION: I can not and will not guarantee that ServerPackCreator will work flawlessly with any other Java version other than version 8. Things may break at random, at any place, if a different Java version is used. You are welcome to try and use any other version, but do not report issues back to me if you do encounter problems when running ServerPackCreator with a more recent Java version.
5. Addons
The addons-section shows an excerpt from the README of the example addon README. Check out the repository of the example addon, linked below, for more details.
5.1. Example Addon for ServerPackCreator
There is an example addon available at ServerPackCreator Example Addon
ServerPackCreator provides several extension endpoints for pf4j plugins, from hereon out called addons, to add additional functionality. This example addon demonstrates an implementation for all available extension endpoints of ServerPackCreator.
The example repository demonstrates how extension for ServerPackCreator are implemented, one small example for every extension point available in ServerPackCreator.
5.2 Available Extensions
5.2.1 Configuration Panel Extension
The configuration panel is intended to let you add a panel in which you, or the user of your addon, may configure something for any of the extensions added by your addon.

The above example lets you configure four textfields, one for each extension point used during server pack configuration checking and server pack generation. More on this in Configuration Check Extension.
Extension configurations are saved to the serverpackcreator.conf of the server pack and re-loaded along with everything else, like the Minecraft version, modloader and modloader version etc.
Docs: Configuration Panel Extension
5.2.2 Tab Extension
Tab extensions allow you to add whole tabs to the GUI of ServerPackCreator. These additional tabs are intended to let you add textfields and such, which allow you to configure your global addon configuration. You may add anything you want to it. The sky is the limit!

The above example adds a button which, when pressed, opens a minimalistic Tetris game in a new window. It's not supposed to be actually that entertaining, but rather to demonstrate that you can do what you want inside your tab.
Below the big button are some textfields which allow you to change some values of the global addon-wide configuration. Global addon-configurations are handed to you by ServerPackCreator when the tab is instantiated.
Global addon-configurations are passed to every extension, along with any available extension-specific configuration, automatically, so you don't have to worry about anything other than actually saving changes you made in the tab.
Maybe have a timer auto-save every few seconds? Your tab, your choice! 😁
Docs: Tab Extension
5.2.3 Configuration Check Extension
The configuration check extension point allows you to run your own config checks, be that on any of the already available data from the server pack config tab, or your own data from the configuration panel, or your own tab, or whatever else you may want to check.

The above example simply checks whether the string in text of the passed CommentedConfig in a list
of passed configs contains text. If it does, then we add a custom error message to the list of errors encountered
during configuration checks.
That list is then displayed to the user after the configurations checks have all run.
Make use of this extension point in combination with the Configuration Panel Extension and/or Tab Extension in order to check user input for any errors!
Docs: ConfigurationCheck Extension
5.2.4 Pre Server Pack Generation Extension
The Pre Server Pack Generation extensions run, as the name implies, right before the generation of a server pack really begins. You may use this to prepare the environment for any of the tailing extensions.

The above example shows the run of a PreGen extension, with the global addon configuration as well as the extension-specific extension passed to it by ServerPackCreator.
Docs: Pre Generation Extension
5.2.5 Pre Server Pack ZIP-archive Creation Extension
The Pre Server Pack ZIP-archive Creation extensions run, as the name implies, right before the creation of the server packs ZIP-archive is, or would be, started. Want to add any files to the ZIP-archive? Or make sure some file doesn't make it into the ZIP-archive?

The above example shows the run of a PreZip extension, with the global addon configuration as well as the extension-specific extension passed to it by ServerPackCreator.
Docs: Pre Zip Extension
5.2.6 Post Server Pack Generation Extension
The Post Server Pack Generation extensions run, as the name implies, after the generation of a server pack has finished. Want to add any files to the server pack, but don't want them to end up in the ZIP-archive? Maybe download, install and configure DynMap with some renderdata? This would be the place to do that!

The above example shows the run of a PreGen extension, with the global addon configuration as well as the extension-specific extension passed to it by ServerPackCreator.
Docs: Post Generation Extension
See now why the ConfigPanel, ConfigCheck and Tab extensions are so nice to have? The possibilities are (almost) endless!😁
5.3 The reason for allowing ServerPackCreator to run addons:
Some people need additional functionality for their server packs, or have some additional wishes for them. Some of those things may not fit into the core functionality of ServerPackCreator itself.
It may also be that it is such a niche feature, that I either don't have the time to code it in, or simply don't want to. Maybe it doesn't fit into the overall design of ServerPackCreator, too. Who knows, it could be any of those reasons or another.
Hence, the addon functionality.
This allows people to write their own addons to expand the functionality of ServerPackCreator with their own features as they see fit.
5.4 Adding your own
A curated list of officially acknowledged addons/plugins can be found here (redirects to GitHub Pages)
How to get your own addon into this list:
If you have written your own addon or plugin for ServerPackCreator and you would like to see it added here, please open an issue over at ServerPackCreator or ServerPackCreatorAddonExample, using the Documentation template.
For an addon to be accepted, you must at least provide:
- The name of and link to the repository, and therefore the addon.
- The owner of the repository, and therefore the addon.
- The branch of the repository where the main code resides in.
- A description of the addon.
6 Running
In every situation, the .jar-file needs to be run from the commandline. Executing it via "Open with..." and selecting Java will not work. To use the GUI, for example, simply run java -jar ServerPackCreator-2.x.x.jar.
The .exe can be executed as usual by simply double-clicking it and is GUI exclusive. It only works in Windows, though. Please keep that in mind.
There are a couple of arguments which may or may not be helpful for you, depending on how you plan on using ServerPackCreator:
| Argument | Description |
|---|---|
-help |
Print ServerPackCreators help to commandline. |
-update |
Check whether a newer version of ServerPackCreator is available. |
-cgen |
Run ServerPackCreators configuration generation. |
-cli |
Run ServerPackCreator in commandline-mode. If no graphical environment is supported, this is the default ServerPackCreator will enter, even when starting ServerPackCreator with no extra arguments at all. |
-web |
Run ServerPackCreator as a webservice. |
-gui |
Run ServerPackCreator with our GUI. If a graphical environment is supported, this is the default ServerPackCreator will enter, even when starting ServerPackCreator with no extra arguments at all. |
--setup |
Set up and prepare the environment for subsequent runs of ServerPackCreator. This will create/copy all files needed for ServerPackCreator to function properly from inside its JAR-file and setup everything else, too. |
6.1 Localization
If you wish to run ServerPackCreator with your locale (if it is already supported), you can either:
- Run
java -jar ServerPackCreator-X.X.X.jar -lang your_localefor examplejava -jar ServerPackCreator-X.X.X.jar -lang en_us. This will create the lang.properties-file with your specified locale. - Running
java -jar ServerPackCreator-x.x.x.jarwithout-lang en_usor any other language will set the locale to en_us by default and create the lang.properties-file. - Modify the
serverpackcreator.properties-file in the same directory as ServerPackCreator-X-X-X.jar and set your locale like thislang=your_localefor examplelang=en_us
7 Contributing
Java documentation available at:
- https://griefed.pages.griefed.de/ServerPackCreator/ or
- https://griefed.github.io/ServerPackCreator/ or
- https://griefed.gitlab.io/ServerPackCreator/
Read contributions before considering contributing to ServerPackCreator.
A short excerpt:
If you want to contribute to ServerPackCreator, then the following procedure must be adhered to:
- Fork ServerPackCreator
- Create a new branch in your fork, following one of the following naming schemes:
- The end of each branch name bust be suffixed with a one-word description fitting the changes made. Examples:
- griefed_chore_readme
- griefed_perf_curseforgemodpack
- griefed_feat_ziparchive
- For more details on what the naming scheme entails, see
.releaserc.ymlin the base directory of the repository or scroll down to the Commits-section.- Schemes:
- your_username_breaking_
- your_username_build_
- your_username_chore_
- your_username_ci_
- your_username_docs_
- your_username_feat_
- your_username_fix_
- your_username_perf_
- your_username_refactor_
- your_username_revert_
- your_username_style_
- your_username_test_
- your_username_other_
- Make your changes to your new branch:
- Try to keep the changes atomic, so they best fit the name of the branch.
- Follow conventional commit messages. See Commits-section for more details. Example:
- feat: Allow upload of modpack-export zip-archive to web-frontend
- refactor: Use apache commons-io for copying, instead of Files
- Open an issue on the main repository, using the Pull Request template:
- Issue title: Your Username - Branch type (e.g. feat) - Short description of your changes. Example:
- Griefed - feat - Allow upload of modpack-export zip-archive to web-frontend
- Issue description: Fill in the sections the template provide.
- Submit the new issue
- I will then create a new branch in the main repository, with the same name as your branch, to which you will then create a pull request to.
- If checks and tests pass, or any changes necessary have been made, the pull request is ready to be merged etc., I will merge it to your main repository branch.
- I can then merge your main repository branch into main/master/whatever locally, push these changes to my GitLab instance, which will in turn push these changes to GitHub.
- Done!
This is the only way to ensure that any changes made to ServerPackCreator always arrive on my GitLab instance first, then on GitHub. Since I want to stay independent of GitHub and their architecture, I have to make use of my own GitLab installation. Hence this procedure. So, if one day, GitHub vanishes, we still can provide people with ServerPackCreator from my GitLab instance.
8. Building ServerPackCreator locally
Clone the webservice branch of the repository:
git clone -b $BRANCH https://git.griefed.de/Griefed/ServerPackCreator.git
Where $BRANCH represents the branch you want to clone.
If you are on linux, run chmod +x gradlew first.
Build with:
build --info --stacktrace
The build task is configured to do everything automatically, from installing frontend dependencies, assembling the web-frontend, copying some files around, build and testing and then, finally, also creating a .exe file.
9. Awesomesauce!
None of this would have been possible without the excellent IDEs by JetBrains. They have kindly provided this open source project with an All Products Pack license. Additionally, ej-Technologies has provided an open-source license for JProfiler for ServerPackCreator, which allows me to resolve performance bottlenecks, pin down memory leaks and understand threading issues. Huge shoutout and thank you!
| JetBrains | IntelliJ IDEA | WebStorm | JProfiler |
|---|---|---|---|
 |
 |
✨ Thanks to all of my Supporters and Sponsors ✨

10. Libraries and Licenses
This project would not be possible without these awesome groups, creators and developers and their wonderful libraries they have kindly provided to people such as me.
License report generated using jk1/Gradle-License-Report
Dependency License Report 2022-10-14
Apache License, Version 2.0
1 Group: com.github.vatbub Name: mslinks Version: 1.0.5
- POM Project URL: https://github.com/vatbub/mslinks
- POM License: Apache License, Version 2.0 - https://www.apache.org/licenses/LICENSE-2.0
2 Group: net.lingala.zip4j Name: zip4j Version: 2.11.2
- Manifest License: Apache License, Version 2.0 (Not Packaged)
- POM Project URL: https://github.com/srikanth-lingala/zip4j
- POM License: Apache License, Version 2.0 - https://www.apache.org/licenses/LICENSE-2.0
3 Group: org.apache.activemq Name: artemis-jms-server Version: 2.19.1
- POM License: Apache License, Version 2.0 - https://www.apache.org/licenses/LICENSE-2.0
- Embedded license files: artemis-jms-server-2.19.1.jar/META-INF/LICENSE - artemis-jms-server-2.19.1.jar/META-INF/NOTICE
4 Group: org.apache.logging.log4j Name: log4j-slf4j-impl Version: 2.19.0
- Manifest Project URL: https://www.apache.org/
- Manifest License: Apache License, Version 2.0 (Not Packaged)
- POM License: Apache License, Version 2.0 - https://www.apache.org/licenses/LICENSE-2.0
- Embedded license files: log4j-slf4j-impl-2.19.0.jar/META-INF/LICENSE - log4j-slf4j-impl-2.19.0.jar/META-INF/NOTICE
5 Group: org.apache.logging.log4j Name: log4j-core Version: 2.19.0
- Manifest Project URL: https://www.apache.org/
- Manifest License: Apache License, Version 2.0 (Not Packaged)
- POM License: Apache License, Version 2.0 - https://www.apache.org/licenses/LICENSE-2.0
- Embedded license files: log4j-core-2.19.0.jar/META-INF/LICENSE - log4j-core-2.19.0.jar/META-INF/NOTICE
6 Group: org.apache.logging.log4j Name: log4j-web Version: 2.19.0
- Manifest Project URL: https://www.apache.org/
- Manifest License: Apache License, Version 2.0 (Not Packaged)
- POM License: Apache License, Version 2.0 - https://www.apache.org/licenses/LICENSE-2.0
- Embedded license files: log4j-web-2.19.0.jar/META-INF/LICENSE - log4j-web-2.19.0.jar/META-INF/NOTICE
7 Group: org.apache.logging.log4j Name: log4j-api Version: 2.19.0
- Manifest Project URL: https://www.apache.org/
- Manifest License: Apache License, Version 2.0 (Not Packaged)
- POM License: Apache License, Version 2.0 - https://www.apache.org/licenses/LICENSE-2.0
- Embedded license files: log4j-api-2.19.0.jar/META-INF/LICENSE - log4j-api-2.19.0.jar/META-INF/NOTICE
8 Group: org.jgroups Name: jgroups Version: 5.2.6.Final
- POM Project URL: http://www.jgroups.org
- POM License: Apache License, Version 2.0 - https://www.apache.org/licenses/LICENSE-2.0
- Embedded license files: jgroups-5.2.6.Final.jar/LICENSE - jgroups-5.2.6.Final.jar/README
9 Group: org.pf4j Name: pf4j Version: 3.7.0
- POM License: Apache License, Version 2.0 - https://www.apache.org/licenses/LICENSE-2.0
10 Group: org.springframework.boot Name: spring-boot-devtools Version: 2.7.4
- POM Project URL: https://spring.io/projects/spring-boot
- POM License: Apache License, Version 2.0 - https://www.apache.org/licenses/LICENSE-2.0
- Embedded license files: spring-boot-devtools-2.7.4.jar/META-INF/LICENSE.txt - spring-boot-devtools-2.7.4.jar/META-INF/NOTICE.txt
11 Group: org.springframework.boot Name: spring-boot-starter-log4j2 Version: 2.7.4
- POM Project URL: https://spring.io/projects/spring-boot
- POM License: Apache License, Version 2.0 - https://www.apache.org/licenses/LICENSE-2.0
- Embedded license files: spring-boot-starter-log4j2-2.7.4.jar/META-INF/LICENSE.txt - spring-boot-starter-log4j2-2.7.4.jar/META-INF/NOTICE.txt
12 Group: org.springframework.boot Name: spring-boot-starter-web Version: 2.7.4
- POM Project URL: https://spring.io/projects/spring-boot
- POM License: Apache License, Version 2.0 - https://www.apache.org/licenses/LICENSE-2.0
- Embedded license files: spring-boot-starter-web-2.7.4.jar/META-INF/LICENSE.txt - spring-boot-starter-web-2.7.4.jar/META-INF/NOTICE.txt
13 Group: org.springframework.boot Name: spring-boot-starter-data-jpa Version: 2.7.4
- POM Project URL: https://spring.io/projects/spring-boot
- POM License: Apache License, Version 2.0 - https://www.apache.org/licenses/LICENSE-2.0
- Embedded license files: spring-boot-starter-data-jpa-2.7.4.jar/META-INF/LICENSE.txt - spring-boot-starter-data-jpa-2.7.4.jar/META-INF/NOTICE.txt
14 Group: org.springframework.boot Name: spring-boot-starter-artemis Version: 2.7.4
- POM Project URL: https://spring.io/projects/spring-boot
- POM License: Apache License, Version 2.0 - https://www.apache.org/licenses/LICENSE-2.0
- Embedded license files: spring-boot-starter-artemis-2.7.4.jar/META-INF/LICENSE.txt - spring-boot-starter-artemis-2.7.4.jar/META-INF/NOTICE.txt
15 Group: org.xerial Name: sqlite-jdbc Version: 3.39.3.0
- Manifest License: Apache License, Version 2.0 (Not Packaged)
- POM Project URL: https://github.com/xerial/sqlite-jdbc
- POM License: Apache License, Version 2.0 - https://www.apache.org/licenses/LICENSE-2.0
- Embedded license files: sqlite-jdbc-3.39.3.0.jar/META-INF/maven/org.xerial/sqlite-jdbc/LICENSE - sqlite-jdbc-3.39.3.0.jar/META-INF/maven/org.xerial/sqlite-jdbc/LICENSE.zentus
GNU Lesser General Public License v3.0
16 Group: com.electronwill.night-config Name: toml Version: 3.6.6
- POM Project URL: https://github.com/TheElectronWill/Night-Config
- POM License: GNU Lesser General Public License v3.0 - https://www.gnu.org/licenses/lgpl-3.0.txt
MIT License
17 Group: de.griefed Name: larsonscanner Version: 1.0.4
- POM Project URL: https://git.griefed.de/Griefed/LarsonScanner.git
- POM License: MIT License - https://opensource.org/licenses/MIT
- Embedded license files: larsonscanner-1.0.4.jar/LICENSE
18 Group: de.griefed Name: versionchecker Version: 1.1.0
- POM Project URL: https://git.griefed.de/Griefed/VersionChecker.git
- POM License: MIT License - https://opensource.org/licenses/MIT
19 Group: io.github.vincenzopalazzo Name: material-ui-swing Version: 1.1.4
- POM Project URL: https://github.com/vincenzopalazzo/material-ui-swing
- POM License: MIT License - https://opensource.org/licenses/MIT
PUBLIC DOMAIN
20 Group: com.github.gwenn Name: sqlite-dialect Version: 0.1.2
- POM Project URL: https://github.com/gwenn/sqlite-dialect
- POM License: PUBLIC DOMAIN - http://unlicense.org/